Visual Directions for ESL Students: A Simple Back-to-School Strategy
Many years ago, when I first started teaching, I remember one particular year very clearly.
I had 18 students in my K–2 ESL pull-out group, and they were all newcomers—literally fresh off the plane. I was trying to communicate with them, get their attention, and teach them our everyday classroom routines.

One day, it was time to go to lunch, and I was trying to get everyone to line up.
“Line up!” I repeated it. I gestured. I pointed toward the door. I said it again. And I was failing miserably. My students weren't being difficult. They simply didn't understand what I was asking them to do. That's when I realized: I needed to show them instead of just talking and gesturing.
Visual Directions for English Language Learners: The Next Week I Tried Something Different
The following week, I came equipped with something new: pictures. I had a picture of a lunchbox and a picture of students lining up. When it was time for lunch, I pointed to the lunchbox picture and said:
“Lunch time. Get your lunchboxes.” Then I pointed to the picture of students lining up.
“Line up.” And this time, something amazing happened. My students looked at the pictures—and lined up. I was standing there thinking, This is it.
The visuals gave them a way to understand what I was saying without needing to know every word in English.
And then, just as I was lining up my ESL newcomers, my principal walked in.
He looked around and asked: “What's going on?”
I said, “We're ready to line up,” and pointed to the picture again.

That experience completely changed the way I thought about classroom directions. I stopped thinking: How can I explain this better? And started thinking:“How can I show them?”
Why Visual Directions Help ESL and Multilingual Learners
When students are new to English, even simple classroom directions can be difficult to understand.

Think about how many directions students hear during a normal school day:
“Line up.”
“Get your notebook.”
“Work with your partner.”
“Clean up.”
“Listen.”
“Wait.”
“Cut and glue.”
For a newcomer, these aren't always simple directions. They are new English vocabulary connected to unfamiliar classroom routines. Visuals provide another way for students to access the meaning.
Visuals can make new content and vocabulary more understandable for English language learners and can help students make connections between what they see and what they are learning. Visual supports can help young English learners understand what they need to do, follow classroom routines, break tasks into simpler steps, and understand new vocabulary.
Visual Supports for Classroom Routines and Transitions
One of the best places to start using visual directions is with classroom routines and transitions. Newcomers have to learn two things at the same time: "What are we doing?" and "What does this English mean?". Visual supports can help bridge that gap.
For example:
LUNCH TIME → LINE UP

Instead of giving 2 verbal directions, students can see the sequence.
It is important to explicitly teach and practice routines rather than expecting students to automatically know what to do.
This can be especially useful for:
- Morning arrival
- Lunch
- Recess
- Bathroom routines
- Centers
- Small groups
- Cleaning up
- Lining up
- Moving between classrooms
How Visual Direction Cards Build Student Independence
This is the part I love most about visual directions. The goal isn't to make students dependent on the cards. The goal is to give them a tool they can eventually use independently.
Instead of a student waiting for you to repeat: “Line up.”, “Line up, please.”, “Everyone, line up.”
You can point to the LINE UP visual. The student looks. The student understands.The student acts.
Visual directions can break routines and multistep tasks into manageable steps and help students complete routines more independently. That is exactly what we want for our students. Less prompting. More independence.
How to Use Visual Directions in an ESL Classroom
You don't need to introduce 100 visuals on the first day. Start small.

1. Choose Your Most-Used Classroom Directions
Start with 5–10 cards:
- Listen
- Look
- Line up
- Quiet
- Clean up
- Partner talk
- Raise your hand
- Write
- Cut
- Glue
Choose the directions you find yourself repeating all day.
2. Say It + Show It
Connect the English words to the picture.
Say: “Line up.” Show LINE UP.
“Listen.” Show LISTEN.
“Clean up.”Show CLEAN UP.
This gives students a visual connection to the English phrase.
3. Practice the Routine
Don't wait until you're rushing to lunch to teach LINE UP. Practice it when there is no pressure.
Show the visual. Say the direction. Model what to do. Let students practice. Then use the same visual every time.
4. Point Instead of Repeating
This is the big one. When a student forgets what to do, point to the visual before immediately repeating the direction. That is how a visual support gradually becomes a tool for independence.
Visual Directions for Classroom Tasks and Academic Activities
Visual directions aren't only for transitions. They can also help during writing, crafts, centers, independent work, and small-group activities.
For example:
LOOK → TRACE A LINE → DRAW → FOLD→ CUT→ GLUE

Students can refer back to the visuals while they work instead of waiting for the teacher to repeat each step. This is particularly helpful for newcomers because students can participate in the task even when they don't understand every word of your explanation.
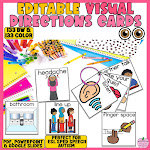
This is exactly why I created my Editable Visual Directions Cards.
The resource includes 133 color + 133 black-and-white editable visual direction cards covering everyday classroom routines, transitions, academic tasks, classroom materials, and more.

Some of the cards include: line up • listen • quiet • partner talk • raise your hand • clean • cut • glue • write • read • color • draw • trace • highlight • match • sort • wait • stop • go • computer work • independent work • lunch • bathroom • nurse • headphones
There are also visuals for classroom materials and activities such as dry erase markers, highlighters, mini whiteboards, paper clips, stickers, tape, scissors, paint, beads, tongs, and more.

How to Organize Visual Direction Cards for Back to School
You don't need to print and display all 133 cards! Start with the directions you use every day.
Create a Transition Set
Clean Up • Line Up • Wait • Lunch • Bathroom • Stop • Go
Create a Work Set
Listen • Look • Cut • Glue • Write • Read • Color • Match
Create a Classroom Routine Set
Raise Your Hand • Partner Talk • Quiet • Independent Work • Computer Work
Laminate your most-used cards and keep small groups together on binder rings so you can grab them quickly.
You can also place a visual where the routine actually happens. For example, put the bathroom visual near the bathroom, the clean-up visual near your centers, and the line-up visual near the door.
Give ESL Students a Tool Instead of Repeating Yourself
That day with my 18 newcomers taught me something I never forgot. Sometimes the problem isn't that students aren't listening. Sometimes they simply don't understand the language yet. A visual direction gives them another way to access the message. And when students can look at a card, understand what is expected, and act independently, you're doing more than making your classroom routines easier. You're giving students agency. And that is a powerful shift, especially during those first few weeks with newcomers.
Try These Free Visual Direction Cards!
Want to see how visual directions can work in your classroom before getting the full set?
I've created a few free visual direction cards from my TPT store here and you can try with your ESL and multilingual learners.

Get More Free Visual Directions here.

Want more first-day ESL tips, crafts, and classroom culture ideas? Sign up for my email list.


























0 Comments